The Basic of Selections
Area Selections:
In many cases, there is a need to perform operations only on certain parts of an image. In fact, this is one of the most common tasks in the digital processing (editing) of an image. The possibility to perform operations only on certain parts of the images enables you to perform accurate editing operations only on those areas needed without having to change the rest of the image. The program contains many tools and functions that enable the selection of an area on the image. An area selected is called a Selection. The selected area is represented by a broken line called Marquee. The part within the selection is called the Selection Area. After the selection operation, it is possible to edit the selection area, copy it, cut it, delete it, move (drag) it to another location, and many other operations. Controlling the selection tools and the selection functions is very important and essential to successful editing works (tasks, operations, etc.).
* When an area(s) is selected all the software commands will run only on the selected area (and not on the entire image)
Fixing specific part of the image using area selection:
Selecting an area on an image
In order to select an area on an image you may use one of the software selection tools/options: Manual Selections, Smarts Selection & Selection Brushes. Additional functions related to selection are found under the Selections menu.
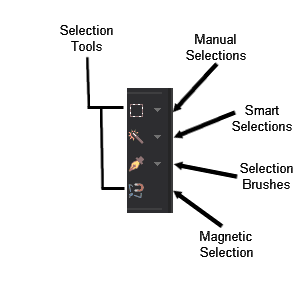
Manual Selection Tools
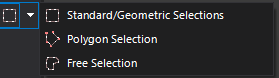
The software's manual selection toolbox contains 3 main selection tools: the Standard (Geometric) Selection tool, Polygon Selection tool & the Free Selection tool. With the manual selection tools it is possible to perform various operations
Read More...
Standard/Geometric Selection Tool
With this tool is possible to select areas on a picture with geometric shapes like squares, rectangles, circles, ellipsis, arrows, stars, hearts and much more, or a combination of the above. In order to activate the tool, press the Manual Selections -> Standard/Geometric Selections menu button in the Tools Toolbar (the left toolbar)
Read More...
Polygon Selection Tool
With this tool it is possible to select areas on the picture in any polygonal shape. In order to activate the tool, press the Manual Selections -> Polygon Selection Tool menu button in the Tools Toolbar (the left toolbar).
Read More...
Free Selection Tool
With this tool it is possible to select areas on the picture in any shape whatsoever. In order to activate the tool, press the Manual Selections -> Free Selection Tool menu button in the Tools Toolbar (the left toolbar).
Read More...
Smart/Auto Selection Tools
 The software's smart/auto selection toolbox contains 3 main selection tools + 2 sub tools: Magic Wand & Super Wand, Selection Brush & Magic Selection Brush and the Magnetic Selection tool. With the smart selection tools it is possible to select super complex area(s) from complex scenes and to perform various operations
Smart Selection Tools tutorials (Take out/in someone from a photo (Or replacing an image background))
Magic Wand & Super Wand (Selection) Tools
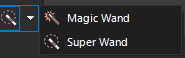
The Magic Wand & Super Wand tools enables the selection of areas in a picture which have similar levels of brightness/hue. (For example, when there is an image on a background with the same hue, it is possible to select the background easily with the Magic Wand. After selecting the background, it is possible to perform the invert operation on the selection and by doing so, in effect, selecting the image). In order to activate the tool, press the Magic Wand/Super Wand Tool menu button in the Tools Toolbar.
* The Super Wand is a new selection tool frst released in PPP 3, it is more powerful then the traditional magic wand and uses some AI algorithms to better select complex area(s)
Read More...
Selection & Magic Selection Brush
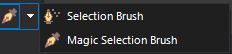
The Selection & Magic Selection Brush tools enables you to "paint" an area(s) that will be selected. Use the regular selection brush to freely select any area by "paint" it and use the magic selection brush to select complex area(s)/objects - simply "paint" over the complex area and the magic selection brush will use AI algorithm to smartly select the desired object . In order to activate the tool, press the Selection Brush/Magic Selection Brush Tool menu button in the Tools Toolbar.
* The Selection & Magic Selection Brush tools are new selection tools frst released in PPP 3
Magic Selection Brush Tutorial
Read More...
Magnetic Selection Tool
With this tool it is possible to select areas on the picture in any shape, the selection's lines will fix themselves automatically on the borderlines of the selected object (line edges - the borderlines/"edges" of the selected object - the areas in which there is a sharp transition of brightness). This tool is very useful when you want to mark/work with an object located on a complex background (when you want to perform an operation only on the object or when you want to separate the object from a complex background). With this tool it is possible to perform the task easily since the selection lines will know to automatically attach/adjust themselves to the outline of the object without troubling the user with precision or effort on his/her part. In order to activate the tool, press the Magnetic Selection menu button in the Tools Toolbar
* Photo Pos Pro v4 magnetic selection (previously known as "Magic Selection" in versions 1.xx) has been re-written from the scratch and have many vast improvements!
Magnetic Selection Tutorial
Read More...
Finishing Work with a Selection
In order to cancel a selection after having finished working on it, use the Select None function (or the click Enter or the Esc key).
Advanced Selection Issues