Tutorial: Saving images for web usage
Web developer/designer? Using Photo Pos Pro you can highly optimize your images for web usage in order to keep maximum image quality while using a small file size
In order to follow this Tutorial please click on the above sample 2.84MB file size photo in order to download it:

To load/open the sample photo you just downloded please click on the
File -> Open... menu and select the photo "SIFW_SamplePhoto1.jpg" from your downloads folder.
By default images created with Photo Pos Pro saved under *.fpos file format (fpos file format is Photo Pos Pro image format that allows saveing rich images including layers & masks, texts, objects, curves and much more while keep original image quality)
Whether you have image in fpos format you've created with Photo Pos Pro or that you have image taken by camera/downloaded and etc. it is a good idea to optimize it for web usage - meaning resize both the actual image size (Width x Height) + compress the image using a compressed file format souted for web usage. Optimzing image for web usage has sevral great advantages:
- Smaller file size loads faster for the end user
- Smaller file size takes less space on server
- Smaller file size takes less bandwidth both for the end user and for you (for your server)
- If you webpage page includes multiple images this optimize the images can greatly improve the all page page overall loading time
- Images and pages that loads fast have higher rank on many search engines
Optimize your images
- Open the desired image using File -> Open... menu or drag it from Windows explorer into the software (to load/open the sample photo you just downloded select the photo named "SIFW_SamplePhoto1.jpg" from your downloads folder)
- If the image dimensions are too big for web usage resize it to the desired size using the Image -> Resize... menu command. Image dimensions for web are almost always in pixels (px). For example the downloaded image size is 2744 x 1824 pixels and the end user screen max size is HD (HD size = 1920 x 1080 pixels) or that you need image smaller than the end user screen size use the resize dialog to resize it to the desired size.
For this tutorial set the width to HD - 1920 pixels and click OK to apply (figure no.1), by default the software will auto calculate the relative height to keep the proportions (when resize photos it is important to keep the proportions of the photo otherwise it will not look proprtional)
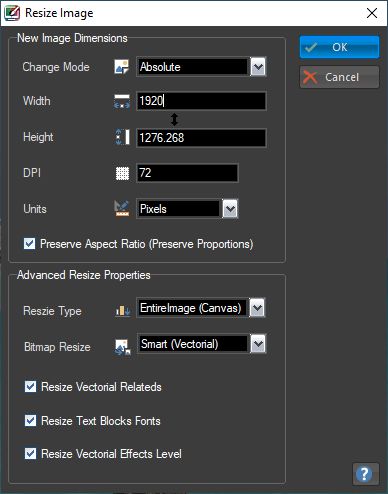
figure no.1
-
Next, save a copy of the image under compressed file format for your web usage (it is always good idea to keep the source image and create a special copy for web usage). Photo Pos Pro supports three popular web file formats:
Jpeg file format (jpg,jpeg): PROS - The best choice for photos, allows high file compression ratio while saving the photo quality. CONS: Not good for sketches or images with a lot of texts, tables and etc. Also does not support transparency
PNG file format: PROS - Lossless data compression , supports up to 16M colors and allows save the image in highest quality, support transparency, in addition to photos good also for sketches and images with a lot of texts/tables. CONS - Since PNG usues lossless data compression full color file size (16M colors) is usually much larger then same image saved in Jpeg means it will take more space and bandwith on the server and will load slower to the end user
Gif file format: PROS - Good for sketches and images with texts and tables that contains up to 256 colors, support transparency, craetes a very small file size. CONS - Supports ONLY up to 8 bits per pixel for each image, allowing a single image to reference its own palette of up to 256 different colors chosen from the 24-bit RGB color space. Meaning that if your image contains more the 256 colors the results of the image quality wil be poor, therefore GIF file format is not recomended for saving photos since photos usually contains much more then 256 colors and save photo as GIF will give very poor quality
For this tutorial we will choose Jpeg file format (jpg,jpeg) as our sample image does not have any transparency and as previously said Jpeg file format is the best choice for photos
To actually compress and save the image:
- Click on File -> Save As... menu to open the Save dialog box
- On the save dialog box type in the desired file name you wish name to image for the web (figure no.2-1)
- Click on the Save as type dropdown and select the Jpeg Image format (figure no.2-2)
- Click on the Advanced button in order to open the Jpeg advanced properties dialog (figure no.2-3). On the advanced dialog you can set the desired quality level and other advanced parameters. For this tutorial we set the quality level to 80 (figure no.3, as higher the quality level the file size will big bigger and less compressed. as lower the quality the file size will be smaller and more compressed)
- Click OK to apply, this will also close the Advanced dialog box and will return you to the Save dialog. Click OK on the save dialog box to save the compressed file for web usage
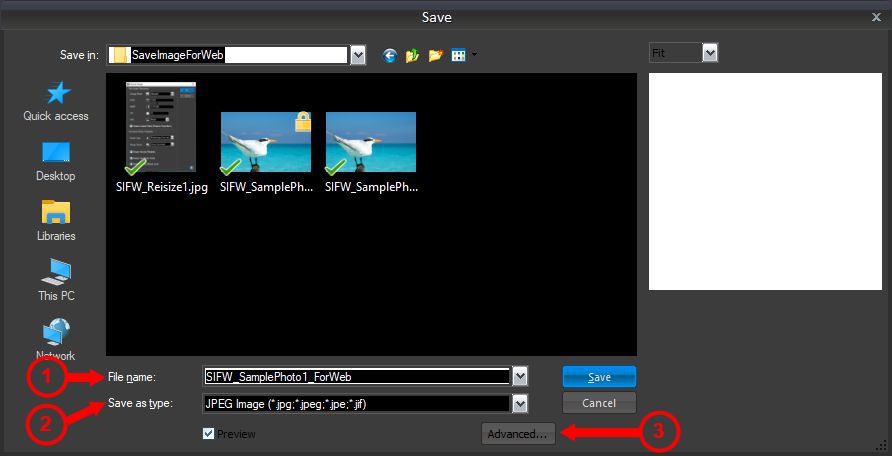
figure no.2
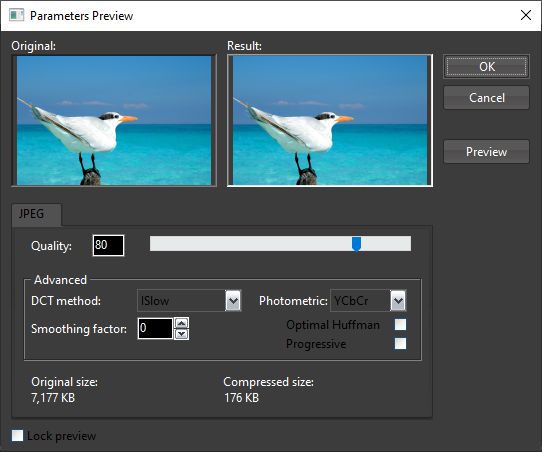
figure no.3
If you'll go and check the file size of the photo we saved for the web you'll see that this file size is much smaller then the original and takes only 176KB (while the original file size was 2.84MB) - Means that the file size for the web is 16 times smaller then the original!
