Chapter 4: Understanding Photo Pos Pro editing principles part C
In this chapter we will continue to learn and to understand the principles of editing photo with Photo Pos Pro.
In order to follow this chapter please click on the above sample photo in order to download it:

In order to load/open the sample photo you just downloded please click on the File -> Open... menu and select the photo "Crop1a_Src.jpg" from your downloads folder.
Cropping photos - Less is more
Another very useful basic common editing action is cropping photos. What is Cropping?
Cropping is the removal of unwanted outer areas from a photographic or illustrated image.
Cropping your photo can greatly improve the photo itself by focusing on the important and removing the unimportant, and also can change the "saying" of the photo. You can read more about the "Art of cropping" here
In order to crop a specific part of the photo and clear the rest, simply follow these steps:
-
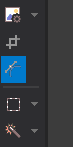
From the Tools toolbar select the Crop tool

-
Using the Crop tool, select the desired area (the area you wish to keep). To do this, left click and hold the mouse button on the upper left of the desired area. Then move the mouse to the bottom right of the desired area and release the button (see figure no. 1)
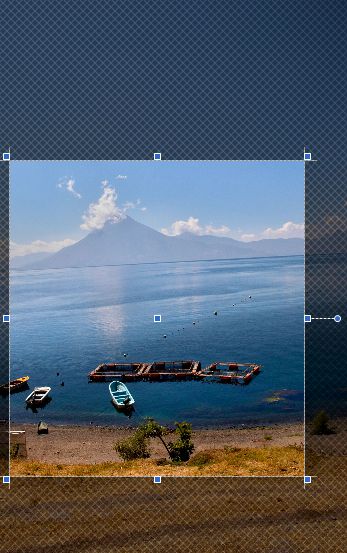
figure no.1
-
[Optional]: After you have performed a selection and you wish to change/move/rotate it, point on its border with the mouse and, pressing the mouse's left button drag/move it to the desired spot
-
To finish and apply the crop press on the Enter key or on the crop button on the tools properties toolbar (figure no.2), this will isolate the selected area, clear away the rest of the image and complete the crop operation (figure no. 3)

figure no.2

figure no.3
Leveling Photos
Next we will use another common basic editing action - Leveling the photo. In many cases and as you can see in our case the photo is not Leveled in reference to the horizon, in order to fix this we will use the Leveler tool.
In order to leveling your photos simply follow these steps:
-
From the Tools toolbar select the Leveler tool
-
In order to level the photo, point the mouse on the starting point of the first reference point (horizon is a good choice), press and hold down the left mouse button . Next, drag the mouse's pointer to the second reference point and release the button (figure no.4)

figure no.4
-
Once releasing the mouse button the software will automatically calculate the maximum area to keep (figure no.5)

figure no.5
-
To apply the leveling click Enter or on the crop button on the tools properties toolbar (figure no.6)
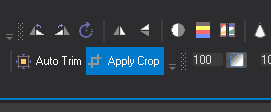
figure no.6
-
Finally you should get the leveled photo (figure no.7)

figure no.7
Note: We advise saving the cropped\leveled image by a different name.
Next, Chapter 5: The power of selections Part A >>>