|
|
|
Vectorial Objects
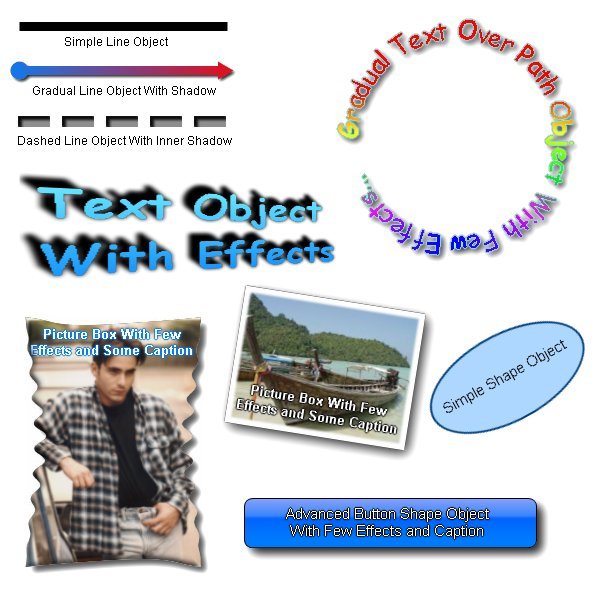
figure no.1
Overview
Vectorial Objects (figure no.1, Also called just Objects in shortly) are common elements that you can create using Photo Pos Pro photo editor tools or load from files.
Note: To edit, change or work on with an existing Object first you have to select it. Vectorial Object can be selected, edited and changed only if the tool you are currently working with is a vectorial object related tool (like the moving, line, shape and text tools). If you wish to edit/change object and the tool you are currently working with is not a vector related tool (like the selections, brush, eraser and etc. tools) you must first have to select a vector related tool. Normally simply select the moving tool.
In generally Photo Pos Pro photo editor deals two types of computer graphics: Raster Graphics and Vector Graphics. Raster Graphics is based on bitmap pixels and is ideal for editing photos while Vector Graphics is based on geometric objects and is ideal for creating computer graphics, illustrations, graphic designs and so.
Using vectorial objects you can build great designs such as business cards, collages, greeting cards, websites interfaces, applications interfaces and any other designs you need. Photo Pos Pro photo editor itself comes with many pre made designs based on vectorial graphics, Click on the menu "File -> New -> Collage�" to view some of these designs. For more info about Templates click here
Photo Pos Pro photo editor has some common major objects:
- Lines.
- Shapes.
- Texts.
- Bitmaps and Picture Boxes.
Vectorial Objects Topic List
Creating Vectorial Objects
Vectorial objects can be easily creating using Photo Pos Pro photo editor.
- To create Lines, Shapes and Texts simply choose the desired tool from the tools toolbar and draw the desired objects. For more info please click the desired issue: Drawing Lines | Drawing Shapes | Drawing Texts
- Bitmap objects are automatically created after moving/pasting part of image. For example if you will select an area on the image, next select the moving tool to move/resize the selected area and click Enter or "Selection -> Select None" to finish, the moved part will became a bitmap object you can later edit.
- Photo Pos Pro photo editor comes with many pre-made objects we created to ease your work, you can browse and load those objects by clicking the "Tools -> Add Browse Objects..." menu on the software main screen. For more info click here
Editing Objects
Vecotorial Objects can be easily edited, fitted and changed as necessary. To edit an Object first you have to select it.
Once the object is selected:
- Left click on the desired object to move it, resize it and rotate it.
- Right click on the object and select the desire command from the pop up menu to edit the desired property (figure no.2).
- To change the object opacity or to change it's place in the object hierarchy (to bring it to forth of the other objects or take it to the back) right click on it, select "Object Position (Hierarchy)" from the pop up menu. This will Open The Layers and Objects properties window. On this windows you can change the object opacity and position. For more info please click here.

figure no.2
Common Editing Tasks:
- Edit Object Color/Style: To edit the object color/style right click on it and select "Color & Style" from the pop up menu (figure no.2) - this will open the object's Color & Style properties box. Next select the desire colors/style on the dialog.
- Edit Text: To change the text in a text object right click on it and select "Edit Text" from the pop up menu, next simply put in the new text and click OK. You may also directly double click on a text object to edit its text.
- Edit Shape: To change the shape object shape right click on it and select "General Properties" from the pop up menu (figure no.2) - this will open the Shape's General properties box. On the shape general properties box select the new desired shape.
- Edit Line: To change the line object look right click on it and select "General Properties" from the pop up menu (figure no.2) - this will open the Line's General properties box. On the line general properties box select the new desired line look.
- Replace Image inside a Bitmap or a Picture Box: To change the inner image of bitmap/picture box object right click on it and select "Replace Object Image/Style" from the pop up menu - this will open the a dialog box where you can select the new image. You may also directly double click on a bitmap/picture box object to open this dialog.
- Replace Bitmap's/Picture Box Frame/Mask: Bitmap and picture box objects has a mask property that defines the look of the object frame. By defaults the object created with a standard regular rectangular look. For example, to create an ellipse bitmap look you have to set an ellipse mask into it. To change the object mask right click on it and select "Replace Object Mask" from the pop up menu - this will open the a dialog box where you can select the new mask image. Photo Pos Pro photo editor comes with pre-made masks you can select from. In addition to the masks comes with the software you can create your own mask easily. To read more about masks click here.
- Set Accurate Object Size, Angle and Location: To set the object size and location accurately right click on it and select "Size, Angle & Location�" from the pop up menu (figure no.2) - this will open the object's Size, Angle & Location dialog box. Next fill in the desires size, angle and coordinates of the object and click OK.
Vectorial Effects
In generally Photo Pos Pro photo editor deals two types of effects: Raster Effects and Vectorial Effects. Raster Effects are working directly on the object's inner bitmap pixels while Vectorial Effects are dynamically added to the object in a way that does not affect it's inner bitmap pixels data. Due to the fact vecorial effects does not affect the object's inner bitmap pixels data they can be remove or edited at any time.
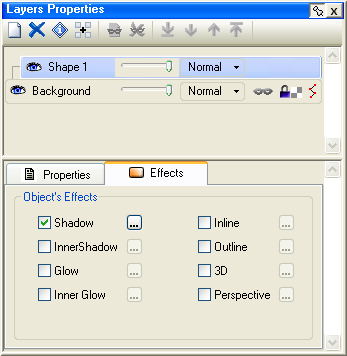
figure no.3
Photo Pos Pro photo editor vectorial effects can be easily accesses via the object's vectorial effects panel (figure no.3, they can also be reached from the software menus).
To add, edit or remove object's vectorial effects simply right click on it and select "Vectorial Effects" from the pop up menu. This will open the objects vectorial effects panel (figure no.3).
Using the panel you can control the object effects, for example if you wish to add shadow mark the "Shadow" check box. To control the settings pf the effect click on the "..." button founds right next to it.
Save and Load Objects
Great thing about objects that they can be easily saved and load separately from the image they are found in. This is very good option if you have an object that you wish to re-use in more then one image or in case that you wish to share the object with others.
- Save Object: Saving an object is very easy - simply right click on the desired object and select "Save Object to File�" from the pop-up menu (figure no.2). Next select the desired name and location where you wish to save the object and click OK to save it.
- Load Object: Loading an object is very easy - select an object related tool (normally the moving tool) from the tool's toolbar, next right click on the anywhere on the image surface and select "Load Object from File�" from the pop-up menu (figure no.2). Next browse to and select the desired object you wish to load and click OK to load it into the active image.
Adding Caption to Objects
Normally the texts tools are using for creating texts, the texts tools are very powerful tools and includes a lot of options.
However, there are many cases where you need to add simple texts and not need all the power of the texts tools, in those cases the desired text can be easily added directly to the object using its "Caption" property.
Note: Not all the objects support captions, the objects that support captions are Shapes, Bitmap and Picture Boxes. If you wish to add text to other objects simply use the text tool.
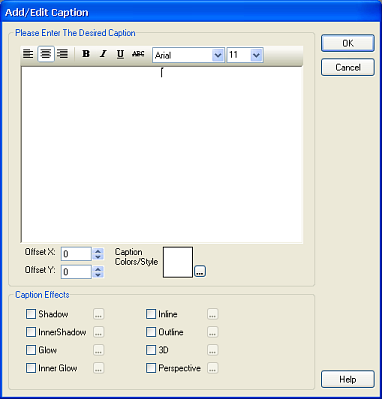
figure no.4
To add/edit a caption to object that support captioning (for example - to add text to a shape object) right click on it and select "Caption..." from the pop up menu (figure no.2), this will open the object's Add/Edit Caption dialog box (figure no.4). On this dialog box simply set in the desired text, color/style and effects. Once done Click OK to finish.
Photo Pos Pro photo editor pre-made objects
Photo Pos Pro photo editor comes with many pre-made objects we created for you to allow you enhance your designs fast and easy.
To use the objects you first have to load them, next you can edit them as any other objects as described above.
Using the pre-made objects:
- Open existing image or create a new one using the File -> New� menu command.
- Click on the "Tools -> Add/Browse Objects�" menu.
- Browse and select the desire object, once you selected the object you wish to add to your design click OK.
- At this stage the object will be load into your design.
Next, in order to change the object colors, image, caption, style, effects and etc. follow the instructions under the Editing Objects and Common Editing Tasks sections.
|
|
|
PhotoPos.com Home Page | Help Home | 1999 - 2013 (c) Copyright Power Of Software. All rights reserved
|
|
