Building Web Pages
Issue: Building web pages using Photo Pos Pro/Turn Your Designs into webpages
Overview:
Photo Pos Pro photo editor allows saving any of your design as a webpage using the HTML Wizard.
The HTML Wizard allows an easy conversion of any Photo Pos Pro photo editor design into a webpage with just a few clicks. Photo Pos Pro photo editor allows you to easily add many cool effects to your webpage, add links, styles and much more without any need of HTML and related knowledge.
Save design as a simple webpage:
To save your design as a webpage simply click on the File -> Save As Webpage� menu and follow the instructions on the screen.
Creating interactive webpage, adding effects, links and etc:
To create interactive webpage with effects first you have to create the webpage design and save it in a Photo Pos Pro photo editor file format (*.fpos file). This is important since the fops file format saves the entire objects and hierarchy of the project in a way that will enable you to edit them in the future when ever you like (unlike standard image file formats like jpg, png and etc. that saves only a "flat" view of the image).
For this tutorial demonstration and to fasten up things we will create a template based design and build a webpage from it. (Templates are actually pre-made designs we created for you in order to fasten up you work, you can also create your own templates. To read more about templates click here).
- Start with creating 600 x 450 pixels new template based image:
- Click on File -> New -> Collage� menu and select the collage named collage (6).fpos and click "Next" (figure no.1)
- In the second screen set the template size to 600 x 450 and click ok to finish (Figure no.2)
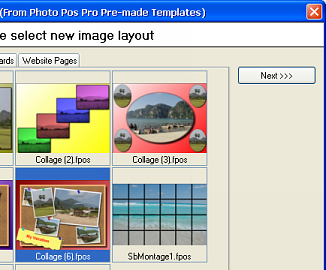
figure no.1
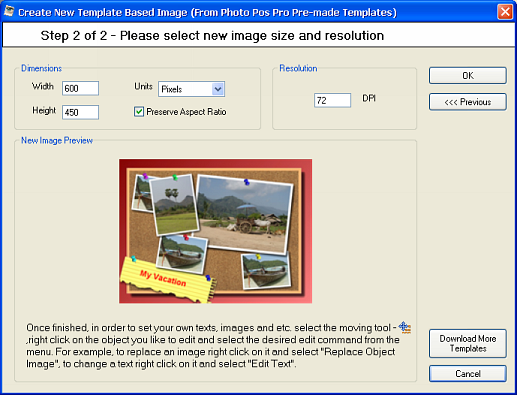
figure no.2
- Fitting the template - Set your own images and texts:
- Choose the Moving/Transform tool -
 . .
- Right click on the big image object at the top-right side of the template and select "Replace Object Image/Style" from the pop up menu. Next select the desired image you wish to put on this place (figure no.3). Repeat this step for each picture in the template - set your own image instead of the template default images. Finally you should get a template with your own images instead of the default ones.
- [Optional]: You may fit the size, location, angle and etc. of any image object by left click on the image and use the mouse and the marks on the screen to do the fittings.
- [Optional]: You may fit the look and effects of any image object by left click on the image and use any of the desired menu commands. For example to brighten a dark image left click on it, next click on the Colors -> Brightness/Contrast... menu and set the desire brightness level.
- [Optional]: There are many other fittings, cool effects and many enhancements you can apply to templates, to learn more about it please click here.
- Once finished fitting the template images insert your own text at the same way - right click on the text object and select "Edit Text" from the pop up menu (Make sure the Moving/Transform tool is selected, otherwise the pop up menu may be deferent according to the current selected tool), insert your own text and click OK to finish.
- Finally you should get your own template based design (figure no.4)
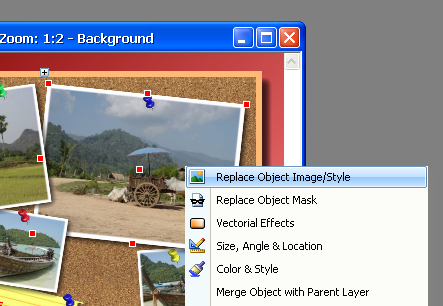
figure no.3

figure no.4
- Setting the web page effects and attributes:
- Right click on the big image at the top right side of the screen and select "Object HTML Attributes�" from the pop-up menu (Figure no.3, make sure the Moving/Transform tool is selected, otherwise the pop up menu may be deferent according to the current selected tool).
- Once clicking on the menu command the object information screen will be opened and the "HTML Attributes" card index will be displayed (figure no.5).
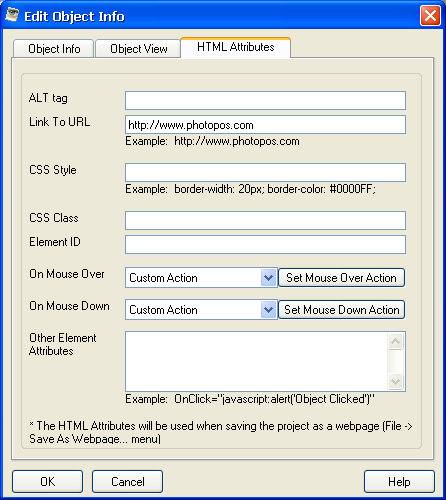
figure no.5
On the HTML card index please do the followings:
- Set the text http://www.photopos.com in the Link to URL box (figure no.5).
- Select the option "Custom Action" in the On Mouse Over drop down box (figure no.5). Doing this will display the "Set Mouse Over Action" button. Click on this button to open the Action Settings screen and check also the Outline and Perspective options (figure no.6, doing this will instruct the HTML Wizard to render those effects as this objects "OnMouseOver" Event effects - meaning that on the HTML Page when user will put the mouse over this image this effect will take place, note that when you first open this screen the effects Shadow and Outline were already checked as those are part of the default look of the image, if you do not want to keep the default look you may change them off curse).
- [Optional] You can fit the parameters of each effect by clicking on the "..." button founds near to it. For example, to change the Outline color click on the "..." button near the Outline check box.
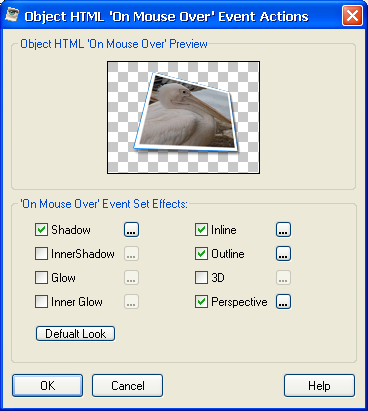
figure no.6
- Click OK to close the Action Settings screen and return to the HTML Attributes card index.
- Select the option "Custom Action" in the On Mouse Down drop down box (figure no.5). Doing this will display the "Set Mouse Down Action" button. Click on this button to open the Action Settings screen and check also the Inner Shadow and Perspective options (Doing this will instruct the HTML Wizard to render those effects as this objects "OnMouseDown" Event effects - meaning that on the HTML Page when user will click with the mouse over this image this effect will take place).
- Click OK to confirm and close all screens.
- Repeat those steps for any image object in the template. You can repeat those steps for any object you wish to be interactive (you can do it for texts, shapes, lines or any other object on your design).
- Finally we are ready to create the HTML Web Page. Before continuing it's recommended to save the design in a Photo Pos Pro photo editor file format (*.fpos file). This is important since the fops file format saves the entire objects and hierarchy of the project in a way that will enable you to edit them in the future when ever you like (unlike standard image file formats like jpg, png and etc. that saves only a "flat" view of the image).
- Click on the "File -> Save as Webpage�" menu to open the HTML Wizard.
- With the "..." button near the output box select the output directory where you wish the HTML file and of all it's related will be saved (By default you have to select an empty directory).
- On the Exported HTML File Name fill the name you wish to call you html page or leave the default name.
- Click OK and the wizard will start the export process of converting your design into an HTML webpage.
- Once finished the HTML Wizard will be close and the created HTML webpage will be open in a browser (by default). If the HTML page des not automatically opens simply browse to the output directory and open it from there.
- If you did everything as explained you should get the webpage, move you mouse over the big image in the template/click on it to see the effects.
NOTE: When trying to open the HTML file you may see this message "NOTE: JavaScript is disabled. This page includes interactive java scripts. To remove this message and view the page properly please enable the JavaScript feature by clicking on the yellow bar at the browser near the top of this page". Usually this message appears when trying to open the HTML file from your local hard drive and does not occurs when user view it from a web server, means that if you'll upload the page to the internet usually you will not encounter this message.
In case you encounter this message simply enable the scripts by clicking on the yellow bar at the browser near the top of the page. The effects will work only after enabling the scripts.
Advanced Options
To set the HTML Page general attributes (like title, keywords and etc.) or to add your own HTML code, scripts and etc. and in order to understand the structure of the page that the HTML Wizard creates click on the "Image -> HTML Page Attributes" menu. One the HTML General Page Attributes you can view the structure of the page the wizard creates. For example to set the title of the page scroll down the main header and enter the desired page title like this:
.
.
.
<TITLE>My Trip to Africa</TITLE>
.
.
.
|
