The Photo Pos Pro photo editor program comes with advanced editing tools with which you can perform pin-point editing and repairing operations of areas on the picture (as opposed to editing functions which operate on either the entire picture or on selection areas) and in so dramatically improving them. For example, you can remove and/or hide scratches and imperfections from the pictures, sharpen certain areas and blur others, emphasize colors in certain areas, distort pictures, add effects from the world of painting such as spreading colors as well as many more additional operations. You can even remove unwanted pimples and moles from facial pictures! The program's toolbox contains 3 main strong and advanced editing tools with a variety of options for pin-point editing and repair in a picture. The use of the tools is very similar to use of the brush tool only that here, instead of performing the regular painting operation, an editing/repairing operation will be performed according to the selected tool and its parameters.
Blend Mode Dropdown Box - With this box it is possible to set the way in which the colors from the paint tool merge with the surface on which it is painting (More Info...).
Use Textures Checkbox - When this option is marked the paint tool will use the texture defined in the Texture Box in the Colors panel.
Negative Checkbox - When this option is marked the paint tool will use a brush that is the Negative of the current (selected) brush.
Dynamic Changes card-index Using the commands in this card-index, it is possible to define the brush dynamic changes. Dynamic changes cause brush to change dynamically during painting (such as become smaller/larger, rotate, change colors and etc.) and by this allows to create great backgrounds and artworks easily.
Angle Change - This command is used to set the dynamic angle change of the brush. The higher the absolute value is, the greater the rotation on each stroke of the brush will be.
Width Change - This command is used to set the dynamic width change of the brush. The higher the absolute value is, the greater the width change on each stroke of the brush will be.
Height Change - This command is used to set the dynamic height change of the brush. The higher the absolute value is, the greater the height change on each stroke of the brush will be.
Hue Change - This command is used to set the dynamic hue (color tint) change of the brush. The higher the absolute value is, the greater the tint change on each stroke of the brush will be.
Sat Change - This command is used to set the dynamic color saturation change of the brush. The higher the absolute value is, the greater the color saturation change on each stroke of the brush will be.
Lum Change - This command is used to set the dynamic color luminance change of the brush. The higher the absolute value is, the greater the color luminance change on each stroke of the brush will be.
Dynamic Mode Dropdown Box - With this box it is possible to select the dynamic change method which the final brush will be based on:
Ping Pong - The change will take effect back and fore (for example the with of the brush will increase dynamically until it will get to the maximum, then it will dynamically decrease to the minimum size and so on..)
Continues Ping Pong - Same as Ping Pong expect that each new paint will be continues of the previous one.
Incremental - The change will take effect in one direction only: back or fore (for example the with of the brush will increase dynamically until it will get to the maximum, then it will get back to the minimum size and will again increase dynamically until it will get to the maximum and so on..
Continues Incremental - Same as Incremental expect theat each new paint will be continues of the previous one.
Incremental Random Value - The change will take effect in one direction only back or fore and the increment will be by a random value that will be in the range of the change value (For example if the width change set to 5 the brush width will increment on each stroke by a random value from 0 to 5)
In Rage Random Value - The change will take effect by setting absolute random value that will be in the range of the changed value (For example if the width change set to 75 the brush width will set on each stroke to a random value from 0 to 75)
Advanced card-index With the commands in this card-index it is possible to define a number of advanced characteristics of the tool.
Angle Slider - This command is used to set the angle of the paint tool which will be used.
Density Slider - This command is used to set the density of the color which will be used by the paint tool. The higher the value of the regulator is, the higher the density of the color will be. The lower the value of the regulator is, the lower the density of the color will be.
Feather Slider - The Feather's value defines how the edges of the object/selected area will look. The lower the value of the Feather is, the sharper will the edges of the object/selected area be. The higher the value of the Feather is, the smoother and "softer" will the edges of the object/selected area be (will cause the edges to gradually integrate with the background).When the Feather's value is greater than 0 (i.e. when there is Feather), it is possible to select one of two types of Feather: Round edges or Sharp edges. The selection of the Feather type is done with the radio dial or the Sharp button (depending on which tool you are using), located near the Feather Box.
Flip H, Flip V Checkboxes - Marking these boxes will cause a horizontal and/or vertical flip, accordingly, to the brush being used.
Outline Checkbox - Marking this box will cause the use of only the outlines of the brush, (without the filling).
Wet Edges Checkbox - Marking this box will cause an effect which resembles coloring with water paints.
Note: Gradient Cycle and Color Mode - These commands are irrelevant when working with the Clone Brush.
How to use the tool
The use of this tool is divided into two steps:
The first step involves selecting the area from which you wish to perform the duplication. To do that, select the layer from which you wish to duplicate, point the mouse on the area you wish to duplicate and click on it with the mouse's right button.
The second step involves the duplication itself. If the layer you wish to duplicate into is different from the layer you wish to duplicate, select it first. In order to perform the duplication, point on the area you wish to duplicate with the mouse and move the mouse to the desired area while holding down the left button.
Note: If the active layer is in invisible mode (Visibility Off) or covered with a mask, the painting over the layer will be performed, but will not be seen on the screen. In order to see the painting on the screen, you must convert the active layer to visible (Visibility On) or neutralize/cancel the mask operation.
Blend Mode Dropdown Box - With this box it is possible to set the way in which the colors from the paint tool merge with the surface on which it is painting (More Info...).
Use Textures Checkbox - When this option is marked the paint tool will use the texture defined in the Texture Box in the Colors panel.
Negative Checkbox - When this option is marked the paint tool will use a brush that is the Negative of the current (selected) brush.
Dynamic Changes card-index Using the commands in this card-index, it is possible to define the brush dynamic changes. Dynamic changes cause brush to change dynamically during painting (such as become smaller/larger, rotate, change colors and etc.) and by this allows to create great backgrounds and artworks easily.
Angle Change - This command is used to set the dynamic angle change of the brush. The higher the absolute value is, the greater the rotation on each stroke of the brush will be.
Width Change - This command is used to set the dynamic width change of the brush. The higher the absolute value is, the greater the width change on each stroke of the brush will be.
Height Change - This command is used to set the dynamic height change of the brush. The higher the absolute value is, the greater the height change on each stroke of the brush will be.
Hue Change - This command is used to set the dynamic hue (color tint) change of the brush. The higher the absolute value is, the greater the tint change on each stroke of the brush will be.
Sat Change - This command is used to set the dynamic color saturation change of the brush. The higher the absolute value is, the greater the color saturation change on each stroke of the brush will be.
Lum Change - This command is used to set the dynamic color luminance change of the brush. The higher the absolute value is, the greater the color luminance change on each stroke of the brush will be.
Dynamic Mode Dropdown Box - With this box it is possible to select the dynamic change method which the final brush will be based on:
Ping Pong - The change will take effect back and fore (for example the with of the brush will increase dynamically until it will get to the maximum, then it will dynamically decrease to the minimum size and so on..)
Continues Ping Pong - Same as Ping Pong expect that each new paint will be continues of the previous one.
Incremental - The change will take effect in one direction only: back or fore (for example the with of the brush will increase dynamically until it will get to the maximum, then it will get back to the minimum size and will again increase dynamically until it will get to the maximum and so on..
Continues Incremental - Same as Incremental expect theat each new paint will be continues of the previous one.
Incremental Random Value - The change will take effect in one direction only back or fore and the increment will be by a random value that will be in the range of the change value (For example if the width change set to 5 the brush width will increment on each stroke by a random value from 0 to 5)
In Rage Random Value - The change will take effect by setting absolute random value that will be in the range of the changed value (For example if the width change set to 75 the brush width will set on each stroke to a random value from 0 to 75)
Advanced card-index With the commands in this card-index it is possible to define a number of advanced characteristics of the tool.
Angle Slider - This command is used to set the angle of the paint tool which will be used.
Density Slider - This command is used to set the density of the color which will be used by the paint tool. The higher the value of the regulator is, the higher the density of the color will be. The lower the value of the regulator is, the lower the density of the color will be.
Feather Slider - The Feather's value defines how the edges of the object/selected area will look. The lower the value of the Feather is, the sharper will the edges of the object/selected area be. The higher the value of the Feather is, the smoother and "softer" will the edges of the object/selected area be (will cause the edges to gradually integrate with the background).When the Feather's value is greater than 0 (i.e. when there is Feather), it is possible to select one of two types of Feather: Round edges or Sharp edges. The selection of the Feather type is done with the radio dial or the Sharp button (depending on which tool you are using), located near the Feather Box.
Flip H, Flip V Checkboxes - Marking these boxes will cause a horizontal and/or vertical flip, accordingly, to the brush being used.
Outline Checkbox - Marking this box will cause the use of only the outlines of the brush, (without the filling).
Wet Edges Checkbox - Marking this box will cause an effect which resembles coloring with water paints.
Note: Gradient Cycle and Color Mode - These commands are irrelevant when working with the Clone Brush.
How to use the tool
The use of the tool is divided in two steps:
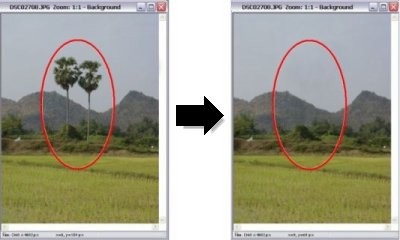
The first step involves selecting the area on the picture which is most similar (and preferably the closest) to the area on which the imperfection is located. To do that, select the layer on which this area is located point on it with the mouse and click on it with the right button.
The second step the repair itself. If the area you wish to repair is located on a different layer, select it first. In order to perform the repair, point on the area where the repair is needed with the mouse. Move the mouse on the area while holding down the left button to perform the repair.
Note: If the active layer is in invisible mode (Visibility Off) or covered with a mask, the painting over the layer will be performed, but will not be seen on the screen. In order to see the painting on the screen, you must convert the active layer to visible (Visibility On) or neutralize/cancel the mask operation.
Blend Mode Dropdown Box - With this box it is possible to set the way in which the colors from the paint tool merge with the surface on which it is painting (More Info...).
Use Textures Checkbox - When this option is marked the paint tool will use the texture defined in the Texture Box in the Colors panel.
Negative Checkbox - When this option is marked the paint tool will use a brush that is the Negative of the current (selected) brush.
Dynamic Changes card-index Using the commands in this card-index, it is possible to define the brush dynamic changes. Dynamic changes cause brush to change dynamically during painting (such as become smaller/larger, rotate, change colors and etc.) and by this allows to create great backgrounds and artworks easily.
Angle Change - This command is used to set the dynamic angle change of the brush. The higher the absolute value is, the greater the rotation on each stroke of the brush will be.
Width Change - This command is used to set the dynamic width change of the brush. The higher the absolute value is, the greater the width change on each stroke of the brush will be.
Height Change - This command is used to set the dynamic height change of the brush. The higher the absolute value is, the greater the height change on each stroke of the brush will be.
Hue Change - This command is used to set the dynamic hue (color tint) change of the brush. The higher the absolute value is, the greater the tint change on each stroke of the brush will be.
Sat Change - This command is used to set the dynamic color saturation change of the brush. The higher the absolute value is, the greater the color saturation change on each stroke of the brush will be.
Lum Change - This command is used to set the dynamic color luminance change of the brush. The higher the absolute value is, the greater the color luminance change on each stroke of the brush will be.
Dynamic Mode Dropdown Box - With this box it is possible to select the dynamic change method which the final brush will be based on:
Ping Pong - The change will take effect back and fore (for example the with of the brush will increase dynamically until it will get to the maximum, then it will dynamically decrease to the minimum size and so on..)
Continues Ping Pong - Same as Ping Pong expect that each new paint will be continues of the previous one.
Incremental - The change will take effect in one direction only: back or fore (for example the with of the brush will increase dynamically until it will get to the maximum, then it will get back to the minimum size and will again increase dynamically until it will get to the maximum and so on..
Continues Incremental - Same as Incremental expect theat each new paint will be continues of the previous one.
Incremental Random Value - The change will take effect in one direction only back or fore and the increment will be by a random value that will be in the range of the change value (For example if the width change set to 5 the brush width will increment on each stroke by a random value from 0 to 5)
In Rage Random Value - The change will take effect by setting absolute random value that will be in the range of the changed value (For example if the width change set to 75 the brush width will set on each stroke to a random value from 0 to 75)
Advanced card-index With the commands in this card-index it is possible to define a number of advanced characteristics of the tool.
Angle Slider - This command is used to set the angle of the paint tool which will be used.
Density Slider - This command is used to set the density of the color which will be used by the paint tool. The higher the value of the regulator is, the higher the density of the color will be. The lower the value of the regulator is, the lower the density of the color will be.
Feather Slider - The Feather's value defines how the edges of the object/selected area will look. The lower the value of the Feather is, the sharper will the edges of the object/selected area be. The higher the value of the Feather is, the smoother and "softer" will the edges of the object/selected area be (will cause the edges to gradually integrate with the background).When the Feather's value is greater than 0 (i.e. when there is Feather), it is possible to select one of two types of Feather: Round edges or Sharp edges. The selection of the Feather type is done with the radio dial or the Sharp button (depending on which tool you are using), located near the Feather Box.
Flip H, Flip V Checkboxes - Marking these boxes will cause a horizontal and/or vertical flip, accordingly, to the brush being used.
Outline Checkbox - Marking this box will cause the use of only the outlines of the brush, (without the filling).
Wet Edges Checkbox - Marking this box will cause an effect which resembles coloring with water paints.
Note: Gradient Cycle and Color Mode - These commands are irrelevant when working with the Clone Brush.
How to use the tool
In order to perform the editing operation on the desired area on the picture, bring the mouse to the desired spot. In order to perform the operation, move the mouse in the desired direction while holding down the mouse's left or the right button. The operation is performed on the active layer.
Note: If the active layer is in invisible mode (Visibility Off) or covered with a mask, the painting over the layer will be performed, but will not be seen on the screen. In order to see the painting on the screen, you must convert the active layer to visible (Visibility On) or neutralize/cancel the mask operation.