Photo Pos Pro free photo editor - Online Help

Custom Search


Help to Photo Pos Pro froever Free!
Even $1 donation can greatly help!

Step By Step Tutorials | How to... (Quick guide for common tasks) | Support & Info Page


Layers

A layer is a work sheet on which many editing functions may be made such as drawing, painting, erasing, pasting images and much more. An image may be constructed of many layers, one on top of another, or one single (default) layer.

When creating large works, using the layers can give you a great advantage. When creating large works, it is recommended that you create them from a number of layers so that it may be possible to easily edit parts of the picture.

Example: Suppose you have a simple picture (with a single layer - the background layer) to which you wish to add a text. In this case, you have two possibilities:
  1. Writing the text directly on the picture (that is, on the Background Layer).
  2. Adding a transparent layer and writing the text on top of it.
In both cases, the immediate visual results will be identical. However, if you did not create a new layer (the first case), the text will be added to the picture in such a way that it will not be possible to change it and/or cancel it after saving the picture. On the other hand (in the other case), if the picture was saved (in *.fpos format which supports layers) you can always edit or remove the text layer since it is a separate layer (which is separated from the Background layer). Editing the text layer will not affect the Background layer. In other words, you can always remove the text layer and return to the original picture, which is the Background layer.

When you create a picture with more than one layer, you must always save it in the .fpos format (the file format of the Photo Pos Pro photo editor program). Saving the picture in any other format will not enable you to edit the layers once you have saved the picture/closed the file and reopened it.

Working with Pictures with Multiple Layers

Every picture contains at least one layer called the Background Layer (default). When working with simple pictures with a single layer (such as .jpg files, when creating a new picture and more), this single layer - the Background Layer serves as the entire picture. In this mode, where the picture is made up solely of the background layer, all the editing operations will be performed on this layer (and since this layer serves as the entire picture, the operations will be performed on the entire picture). When working on a picture with multiple layers, all the editing operations are performed on the Active Layer (the active layer is the layer selected from the Layers Window). When you wish to perform editing operations on a picture with multiple layers, you must first select the desired layer from the Layers window (if this layer is not the active layer), and then perform the operation. Note: Apart from appearing in the Layers window, the name of the layer also appears in the Title Bar of the same picture immediately after the name of the picture and its Zoom.

Layers & Objects Menu

This menu contains functions related to layers such as creating a new layer, deleting a layer, renaming a layer, changing of a layer's location and more.
Create New Parent Layer

A function which creates a new parent raster layer in the picture. The new layer will be located above the active layer. The function's dialog box contains 2 parameters:


Item Info

A function used to view/edit the info of an item. In order to view/edit the info of an item, you must first select it from the Layers Window and afterwards activate the function.


Delete Item

A function used to delete items. In order to delete an item, you must first select it from the Layers Window and then activate the function.


Merge (Flat) All Layers and Objects

A function that creates a new picture which is made up of the combination of layers on which the function is activated. The new picture will contain only one layer which will look like the combination of the layers on which the function was activated. In the new picture, it will not be possible to edit every layer separately (the original picture will not be damaged).


Change Item Position

This sub-menu contains a number of functions that allow the changing of hierarchic positions between the layers/objects. In order to change the hierarchic position of an item, you must first select it from the Layers Window.
  • Move to Bottom - Pressing this button will move the item to the bottom-most place in the layer/object hierarchy.
  • Move Down - Pressing this sub-menu will move the item one step below in the layer/object hierarchy.
  • Move Up - Pressing this sub-menu will move the item up one step in the layer/object hierarchy.
  • Move (to) Top - Pressing this sub-menu will move the item to the top-most place in the layer/object hierarchy.


The Layers Window


* To view the layer's properties window press F3.

The Layers Window is the main tool used to organize layers when working on pictures with multiple layers. With the Layers Window you can perform numerous layer-related operations such as changing the hierarchic levels of the layers, changing the opacity level of the layers and changing the Blend Mode of the layers. You can add masks to the layers and remove them, hide layers, create Blend Graphs and more. The Layers Window displays at all times the properties (details) of the layers of the picture which is being worked on at the moment (the active picture). In order to display the Layers Window, press the Show/Hide Layers Dialog Box button - 
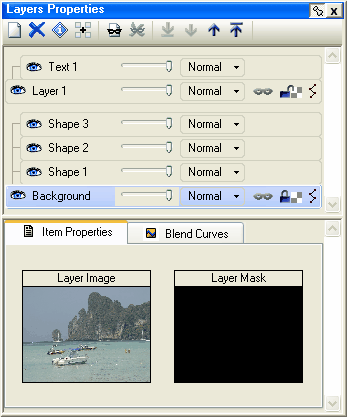
located on the Shortcuts toolbar in the program (or press F3). The Layers Window has three primary parts:
  1. The Toolbar - The toolbar is used to perform different operations on the layers.
  2. The Layers List - With the list you can select the active layer and change its properties.
  3. The Properties of the Active Layer - A portion of the Layers Window displaying the parameters of the active layer. It displays the Thumbnail of the layer and of its mask (if it has a mask), as well as enables you to see and edit the Blend Curves of the Layer.


The Toolbar (1)

The toolbar enables a variety of layer and mask-related operations. All of the operations which the toolbar enables can be performed through the Layers and Masks Menus.

The Layers List (2)

The Layers list is located under the Toolbar. The Layers list is made up of a list of rows (lines), each representing a layer on the picture. Through the Layers list it is possible to select the layer you wish to work with. In order to select a layer, click on the layer's name in the list. The layer will be activated (its name will be marked in blue) and all operations performed will be done on this layer. Each line on the Layers list contains both the layer's name, as well as the layer's main properties, in such a way that enables you to edit them:
  1. Visibility Mode: Defines whether the layer is visible (when the button is pressed) or hidden (when the button is not pressed).
  2. Layer Name: The name of the layer. The name of the layer can be changed using the Rename button in the Toolbar.
  3. Opacity: The level of Opacity/Transparency of the layer. The value of the regulator sets the level of Opacity/Transparency.
  4. Blend Mode: The Blend mode between the layer and the layer beneath it.
  5. Mask Mode: Relevant only when the layer has a mask. If a layer has a mask, it will be activated by pressing this button and cancelled when the button is not pressed.
  6. Toggle Transparency Channel ON (Lock Mode): This button/menu determines whether it is possible to erase/draw on the transparent areas of the layer (when the button is not pressed) and whether it is not possible to draw on/erase these areas (when the button is pressed).
  7. Blend Curves Mode: Enables you to activate (when the button is pressed) or cancel (when the button is not pressed) the Blend Curves (Details on the Blend Curves ahead).
If a picture has a floating selection, it will appear as a layer in the Layers window in such a way that will enable you to perform on it some of the operations that can be performed on layers (such as changing places amongst the hierarchic levels of the layers and changing its transparency).

The Active Layer's Properties (3)

This part of the Layers window contains indexes (Tabs) containing the properties of the active layer and its Thumbnail as well as that of its mask (if one exists).

Layers Properties Tab - This card-index contains the Thumbnail of the active layer and that of its mask (if one exists). The card-index also displays the name of the active layer, its Visibility Mode, its level of Opacity and its Blend Mode.

Blend Curves Tab - Each layer on the picture has 8 Blend Curves. A Blend Curve is a curve which defines the way that a layer blends with the layer beneath it depending on one or more of its color channels and/or its Brightness or that of the layer beneath it. Through (Using) the Blend Curves, you can control with precision the way in which a layer blends with the layer beneath it. You can define which colors/hues on the layer will be transparent, which will be semi-transparent and which hues will be normally displayed. An example on the use of curves lies ahead. The Curves card-index contains a toolbar which enables you to select the curve you wish to edit as well as buttons enabling you to change and edit the Curves Graph (standard graph buttons). The toolbar contains the following buttons:
  1. Current Layer Button - This button is used to display the layer's set of Blend Curves, depending on its own hues. Each layer contains four graphs of this type (one for each channel - red, green, blue and brightness). The graph displayed will be one of the four graphs (depending on which channel's button is pressed in the toolbar).
  2. Underlying Layer Button - This button is used to display the layer's set of Blend Curves depending on the hues of the underlying layer. Each layer contains four graphs of this type (one for each channel - red, green, blue and brightness). The graph displayed will be one of four graphs (depending on which channel's button is pressed in the toolbar).
  3. Brightness/Red/Green/Blue Channel Button - This button is used to display the curve of the selected channel (from the set of curves selected in sections 1 or 2).
  4. The toolbar contains 3 additional buttons which enable you to edit the selected graph. The 3 buttons are standard buttons in the program used for editing graphs. For more information on how to use and edit the graphs click here.
In order to edit a layer's graph, select it from the list. Afterwards, press the Current Layer Button or the Underlying Layer Button in the toolbar to select one of the two sets of graphs. When you are done, press the Brightness/Red/Green/Blue Channel Button in order to select the desired graph from the set. Now, after you have selected the graph, you can edit it and change it in the normal fashion used for editing and changing graphs in the program.


PhotoPos.com Home Page | Help Home | 1999 - 2013 (c) Copyright Power Of Software. All rights reserved