Photo Pos Pro free photo editor - Online Help

Custom Search


Help to Photo Pos Pro froever Free!
Even $1 donation can greatly help!

Step By Step Tutorials | How to... (Quick guide for common tasks) | Support & Info Page

Overview

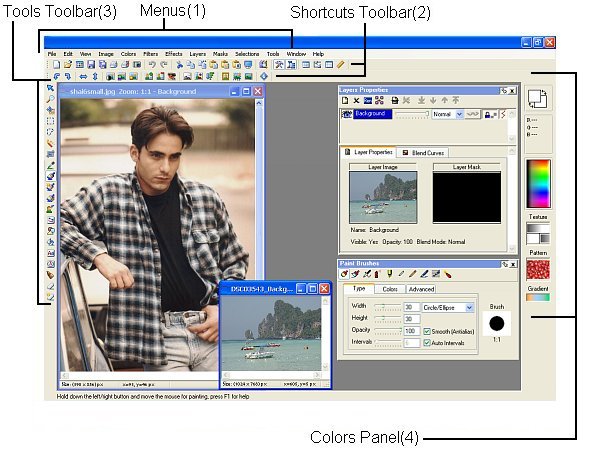
If you have no prior experience in digital image editing, then you have reached the right place. This chapter will present to you, in step by step fashion, the basis to digital image processing and will help you enter effortlessly into the wonderful world of digital image editing. With the program you can edit existing images as well as create new images, illustrations and drawings from scratch. In order to get the most out of the program, you must become acquainted with the user interface. The program's user interface is a standard user interface common to programs working in the Windows environment. The interface contains menus, pop-up menus, toolbars, dialog boxes, work windows and more. The program has primary work states:
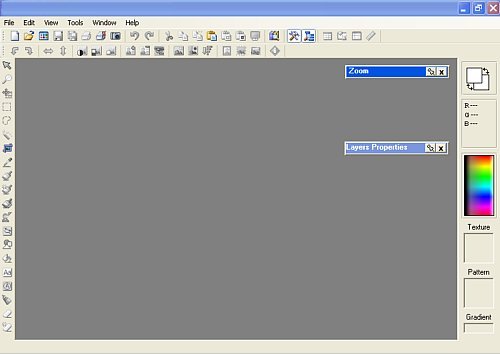
  1. Reduced State - The state in which the program is loaded. In this state, there are no images opened on the screen; the toolbox, toolbars and Layers window are not available and only a limited number of menus are displayed.


  2. Work State - The state in which the program is in most of the time. This is the state in which an image is open and active in the program window. This state includes all of the options which the reduced state has plus many more options. In this state, many diverse menus are displayed; the toolbox, toolbars and Layer window all become active and available. The program alternates from reduced state to work state automatically.


Here is a short detail of the program's interface:
  1. Menus - The menus contain most of the program's functions and are used to activate them.
  2. Shortcuts Toolbar - A toolbar containing shortcuts for the common operations from the menus.
  3. Tools Toolbar - A toolbar containing many editing and image editing tools which is also used to activate them.
  4. Colors Panel - The Colors Panel contains the following elements:
    1. Fore Color - One of two main colors used by many tools in the program. The fore color box can be found at the top of the colors panel on the left. To select a new fore color, click on the fore color box and choose a new color. Another option to choosing a new fore color is by clicking the left button of the mouse on the desired color in the colors box.
    2. Back Color - One of two main colors used by many tools in the program. The back color box can be found at the top of the colors panel on the right. To select a new back color, click on the back color box and choose a new color. Another option to choosing a new back color is by clicking the right button of the mouse on the desired color in the colors box.
    3. A Color Representation - A color representation in the RGB format
    4. A Color Representation - A color representation in the hex format used for web pages.
    5. Colors Box - The colors box is located in the center of the color panel. The colors box is used primarily for selecting fore and back colors. To select a new fore/back color, position the mouse pointer on the desired color in the colors box and press left click for fore color or right click for back color.
    6. Texture Box, Pattern Box & Gradient Box - contains the Texture/ Pattern/ Gradient with which the editing tools and image editing functions will make use (if selected). In order to select a Texture/ Pattern/ Gradient, you must click the desired box.
Working Procedure with the Program

The program contains dozens of image editing functions, functions for repairing images, effects, work tools, editing tools, selection tools and many more diverse possibilities. Even though there is much diversity, it is possible to separate most of the program's operations into a number of principal categories:
  1. Image editing Functions (such as color and brightness changes, image repairs, filters, effects and many more) - These are the principal functions found under the menus and in the Shortcut Toolbar.
  2. Drawing and Editing Tools (such as paintbrushes, general drawing tools, text tools and more) - These tools are found under the Tools Toolbar menu.
  3. Selection Tools (such as the Standard Selection, Magic Wand and more) - These tools are also to be found under the Tools Toolbar menu.
  4. Layers and Masks Tools (such as creating and deleting layers and masks, changing and editing layers and masks and more) - These tools are generally to be found under the toolbars in the Layers window.
  5. Assorted/Other - All the rest of the tools and windows in the program such as the Layers window, Tools properties dialog box, image browser, script window, administration windows of the Textures, Patterns & Gradients and more.
Now that you've become acquainted with the user interface you can start learning the basics of digital image editing and begin performing common operations. After you learn the basic operations, you can continue to advance with the guided instruction of this help until you reach a perfect level of control over the program. All this will enable you to perform complex and impressive editing, drawing and creating operations.
Please choose the next subject you wish to learn:
  1. Basic Operations in Image Files - In this chapter you will learn about opening and saving image files, creating new images from scratch, browsing images and more.
  2. The Basics of Image Editing - In this chapter you will learn about the most basic and common operations in the field of image editing that will enable you to perform common editing and repairing operations of images.
  3. The Basics of Selection - In this chapter you will learn about a central theme in this program called Selection. Through the selections you can reach a very high degree of control over your operations.
  4. Effects - The image editing program contains many diverse effects. In this chapter you will learn how to use most of them.
  5. Advanced Image Editing - This chapter reviews and encompasses all the image editing capabilities of the program and contains many sub-chapters.
  6. Broaden the Capacity of the Program Yourselves - This is a very important chapter where you will learn how to broaden the capacity of the program yourselves! In this chapter you will learn about curves (graphs) customized filters and scripts.
  7. Additional Information - The help guide contains additional information on many issues (such as printing and scanning images, working with many files - Batch Operations, Scripts and more). In order to find information on subjects which were not mentioned here, please look at the help guide or perform a search for the subject of interest.


PhotoPos.com Home Page | Help Home | 1999 - 2013 (c) Copyright Power Of Software. All rights reserved